
Sampling every source in the water cycle: ocean, lakes, rivers, tap water and rain...from source to source
Why conduct the survey?
GOES tagger and microscope HTML software; download here
From water source to water source, the transport of microplastic and toxic chemicals around the planet
The GOES tropical and sub-tropical Atlantic water sampling for plankton and microplastic was the first time that there had ever been a sampling transect that ran across the Atlantic Ocean.
Billions are spent on oceanographic ships and satellite observation, but not a single analysis along the equator. We know that 80% of the weather is controlled and regulated by the oceans, and we know the primary mechanism for energy transport is water, and we know that the surface water SML regulates water evaporation, cloud formation, rain and the energy in the atmosphere.
The equatorial Atlantic is therefore crucial for understanding the weather, and given that plankton maintain the SML and microplastic and pollution destroy the layer, it is kind of important to know what is going on. But there have been zero!!! Ziltch!!! absolutely no surveys of the ocean until the GOES community science project.
The equatorial Atlantic regulates the weather for the top of South America, Central America and a major part of the USA. It makes you wonder how much more is missing for the data that could allow for more informed decisions to be made about the climate, ecosystems and nature.
We aim to try and fill that gap with what could be the most ambitious world community project to map the flow of microplastic everywhere, from a raindrop to an ocean, in lakes and rivers and even what comes out of a faucet from municipally supplied water, from Source and back to Source. So all water samples for everywhere matter, it could be a river, lale coastal water sample, rainwater or even municipal drinking water. You do not need to own a blue water yacht to be an important part of this survey
The idea in one line
Every sample — from a raindrop to the deep ocean — goes through the same filter, the same way. Only the way you collect the water changes from source to source. Keeping the method identical is exactly what lets us compare a raindrop with an ocean, so please follow the shared steps carefully.
What you’ll need
- Your GOES filter drawings are provided for you to copy, or we can provide you with a filter
- A microscope and a computer, a simple 5MP USB camera with a polarising filter, available from Amazon, if higher resolution is available then great, but it must have a polarising filter
- A supply of clean water for blanks — shop-bought distilled or deionised water is fine, but please use the same brand/type every time, or if you have a home Reverese Osmosis, Ultra Filter or ceramic drinking water filter, that should also be okay.
- For rainwater only: a collection funnel and container (see Source 5)
Before you start: avoid wearing fleece or other fluffy synthetic clothing — it sheds plastic fibres into the air and into your sample (and you breathe them in too). A smooth cotton or non-synthetic top is better.
The kit & filter design
Every source in the water cycle is sampled with the same filter. It is built from a length of PVC pipe with a slip-over end cap and a standard PVC pipe union at the base that houses the acrylic filter cartridge. The cartridge is two acrylic plates holding a filter paper between them, each plate drilled with five 5 mm holes: one central and four on a 20 mm pitch circle. The kit is lowered on a Kevlar or steel cord and collects exactly 500 ml per fill.
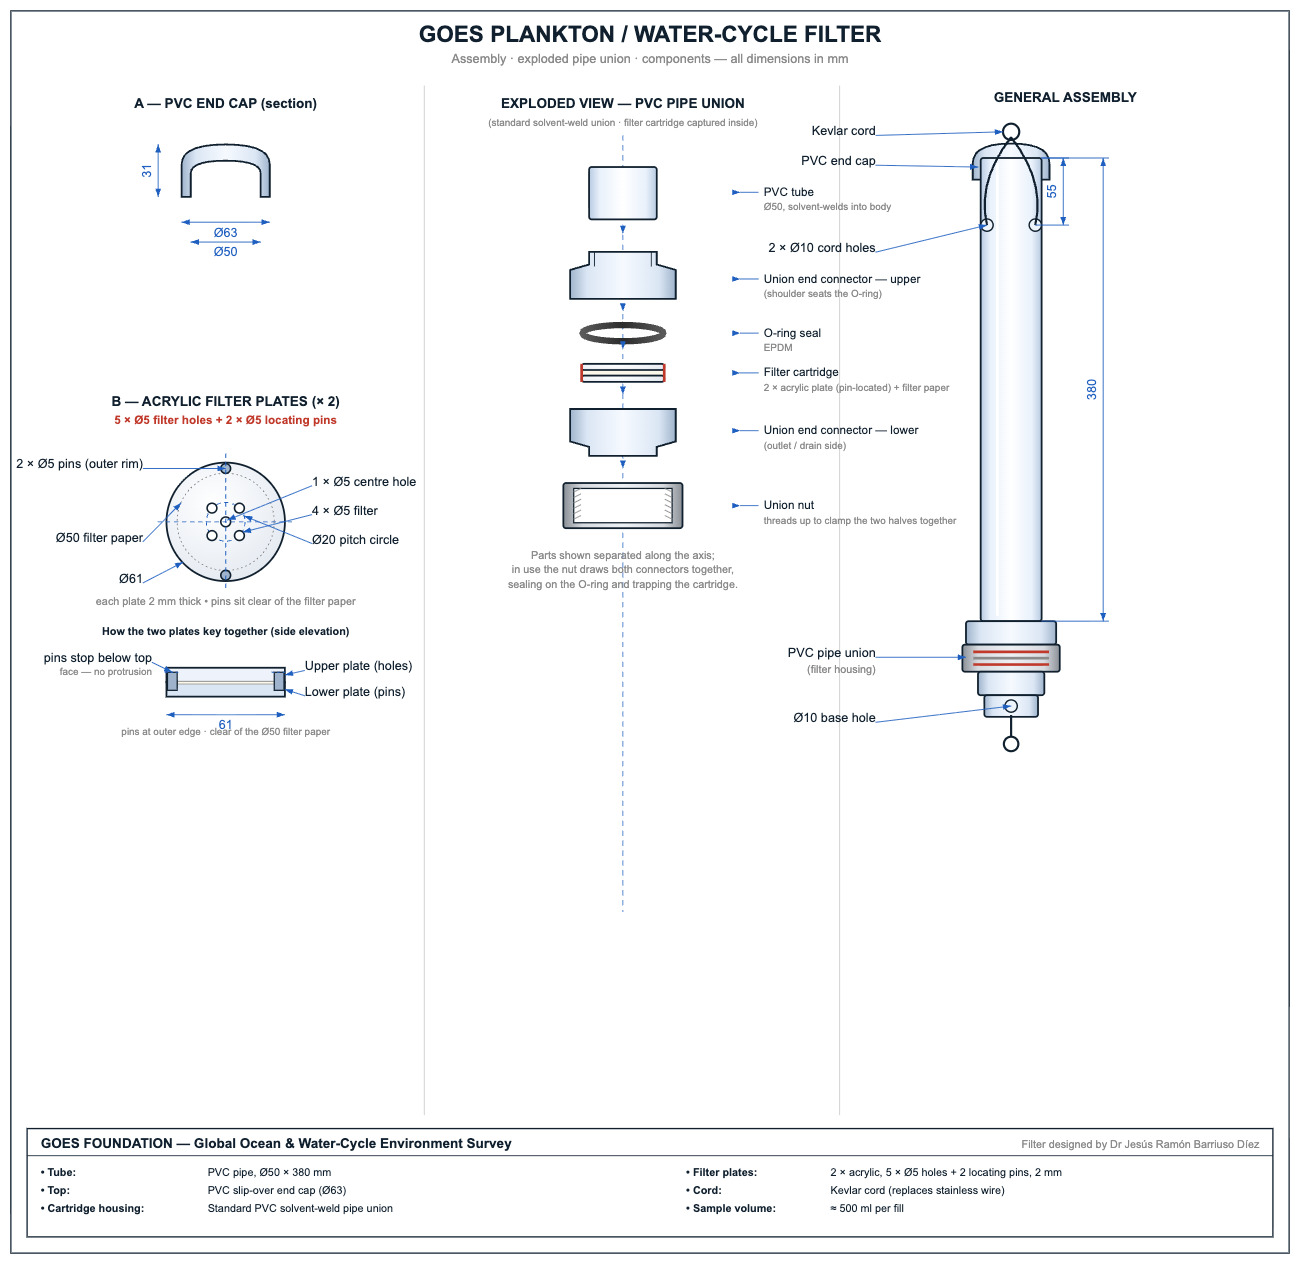
The equipment


What it costs & where to get it
The whole kit costs about $130 — similar to a conventional student plankton net. Donations are welcome and help us supply filters to schools and community projects for free.
- GOES plankton filter — approx. €80
- USB microscope, 5 MP or better, fitted with a polarising filter from Amazon — approx. $50.
- Filter papers, from Amazon — 40–50 mm, ~20–30 µm (Camlab 1173270 Grade 4 / Whatman Grade 4) — approx. $10 per 100.
- Stainless-steel tweezers — approx. $10.
- 90 mm Petri dishes from Amazon (glass or plastic, reusable) — approx. $10 per 20.
Beyond the science, the kit is good fun: you can explore every plankton group under the microscope, and because so little is known about deep-ocean plankton, you might even spot something new.
Watch: sampling in action
A short demonstration of marine sampling with the filter. (The new kit uses two locating pins and a Kevlar cord, as shown in the drawing above.)
Please note that a new video will appear here shortly; the one above has been modified considerably. There is no longer any need to keep written records and spreadsheets. However, please use the video as a guide for how to take the sample.
Part 1 — Collecting your water
Pick the section below for your source. Each one ends the same way: you fill the filter tube with about half a litre of water, ready for Part 2.
Source 1 — Marine / ocean (from a boat, pier or from the shore)
- Attach the filter to its stainless chain and wire.
- Lower it over the leeward side into the water.
- It is important to take a sample at 12:00 hrs and 24:00 hrs local time; if you can take more samples, that would be perfect, but always try and take two at the specific time.
- Fill the tube about ¼ full, lift and empty it. Repeat three times. This flushes out any fibres left from last time.
- On the fourth fill, fill the tube completely — this is your sample.
- Go to Part 2.
Shore or pier: if you can’t sample from a boat, lower the filter on its chain from a jetty or rocks into clean, moving water, well away from the edge, and follow the same flush-three-times-then-fill steps.
Source 2 — Lakes
- Sample from a jetty, boat, or by wading out a little — reach below the surface film, not the very top skin of the water, and away from the muddy edge.
- Fill the tube ¼ full with lake water, empty it, and repeat three times to flush.
- Fill the tube completely on the final fill.
- Go to Part 2.
Source 3 — Rivers
- Face upstream and collect from flowing water, not a stagnant pool at the bank. Only go in as far as is safe (see Safety).
- Fill the tube ¼ full, empty, and repeat three times to flush.
- Fill the tube completely on the final fill.
- Go to Part 2.
Source 4 — Municipal / tap water
- Choose the tap/facet and note it on your sheet (the kitchen cold tap is a good standard choice).
- Run the tap/facet for about two minutes first, so you’re sampling the mains supply rather than water that’s been sitting in the pipe.
- Fill the tube ¼ full, empty, and repeat three times to flush.
- Fill the tube completely on the final fill.
- Go to Part 2.
Source 5 — Coastal water
- Samples can be collected at any location, but it is best to avoid beaches that may have a high suspended sand content
- Fill the tube ¼ full, empty, and repeat three times to flush.
- Fill the tube completely on the final fill.
- Go to Part 2.
Source 6 — Rainwater (needs an extra collection step)
Rain is the one source you have to collect first, and the collector itself can add contamination — so this step needs a little extra care.
Setting up your rain collector:
- Use a funnel feeding into a container. Glass or stainless steel is strongly preferred — plastic funnels and bottles shed the very microplastics we’re trying to measure. If you can only get plastic, use the exact same one every time and be sure to run rainwater blanks (Part 3).
- Rinse the funnel and container with distilled water before you put them out.
- Place the collector in the open sky—away from overhanging trees, roofs, and gutters. We want rain straight from the sky.
When you have enough rain:
- You need enough to flush three times and fill the tube — roughly a litre in total. In heavy rain this comes quickly; in light rain you may need a wider funnel or a longer collection.
- Rotate the collection bottle to make sure everything is in suspension before you flush the tube and take your final 0.5 litre sample
- Use the collected rainwater to flush the tube ¼ full, empty, and three times, and then fill completely.
- Go to Part 2.
Part 2 — Running the sample (identical for every source)
GOES tagger software Download here. The software is HTML so nothing is loaded on your computer, and it works offline. You can use it to connected to your microscope camera to geotag the images with the GPS position, date, time, source and your name and then save to a folder.
This is the heart of the method and is the same for all five sources.
- Let it drain. Hang or stand the full filter so water drips out of the base through the filter paper. This takes 4 hours; always leave it for 4 hours, out of direct sunlight if possible. Keep the end cap on during this time to stop dust and airborne fibres falling in.
- Record the time the sample was taken
- Record the exact GPS of the sample location; you can use a phone with built-in GPS (all smartphones).
- When fully drained after 4 hours, stand the filter upright, unscrew the union, and lift out the two plates with the filter paper. Remove the filter paper from between the two plates and place on a 90 mm Petri dish
- Work quickly and keep the open time short. From here the filter paper is exposed to the air — don’t lean over it, don’t breathe on it, and don’t leave it open longer than needed. Avoid wearing plastic clothes, especially a fleece that will shed plastic fibres.
- Put the filter paper in the petri plate under the microscope. Focus on the centre hole and turn the polarising filter fully on (removes glare) and the light fully up, turn the magnification fully up. Fill the field of view with the 5 mm hole. If using the GOES tagger software, align the circle to the circle on the filter paper.
- You need to enter the sample details into the program (GOES Tagger) before the images Details include , gps position, date, your local time, water type, location, and your name
- Photograph: You can use the software provided by the camera or on your mac or PC, but best to use the software that we developed to take the photo and file the images. Download here. It is very important that the image is as sharp as possible, so take time to focus. Avoid a table that is vibrating or not perfectly stable.
- Repeat for all five holes. You’ll finish with 5 photos which are then saved to a folder on your computer. The whole inspection should take no more than 5 minutes.
- Remove the used filter paper, clean the plates with distilled water, and fit a new paper, and you’re ready for the next sample.
Using the microscope & software (step by step)
The GOES Tagger software is HTML-based. Download here. should work with most microscope cameras with a Mac and PC. However just in case it doesn’t, you can still use the software specific to your microscope, and then upload the images into the Goes Tagger
The five holes are photographed under the microscope. Here is the practical setup, based on a typical 5 MP USB microscope:
- Use a microscope with a polarising filter; a 5 MP USB microscope or better.
- Software: download DigiCapture Pro from the microscope maker’s download site (Windows or Mac) — or use the built-in Camera app on Windows or Photo Booth on Mac.
- In settings, choose the highest resolution (e.g., 2592 × 1944) and capture format JPG.
- Set a photos folder to store the images
- Take 5 photos of the sample and store it in a temporary folder
- The photos can then be sent to the GOES Photo tagger, or you can use the GOES Tagger to take the photos and file the photos, this would be the best option if the program works with your microscope.
Part 3 — The clean-water check (“blanks”)
This is what makes your data trustworthy. It tells us how many particles come from the kit and the air rather than from the water — so we can subtract them. Without it, we can’t tell a real result from contamination.
It’s simple: sometimes, instead of real water, you run distilled water through the exact same procedure.
- How often: roughly 1 sample in 20. (We may ask some volunteers to do more when they first start, or when a new batch of kit goes out.)
- How: use your RO Reverse osmosis, ir UK Ultra filterd or ceramic filtered water, you may also use distilled/deionised water in place of the source water and do everything else identically — the same three flushes, the same drain and hang, the same time open under the microscope, and the same five photos.
- Rainwater blank: pour distilled water through your rain funnel and container first, then through the filter — this catches anything the collector adds.
- Store the image in a folder given a name, “Rain”, “Blank river”, “Blank marine”, “Blank lake” or “Blank municipal”. The image should still be geotagged, but the exact position and time are not so important
A blank is only useful if it goes through all the same steps as a real sample. Don’t rush it because “it’s only a blank” — a rushed blank hides exactly the contamination we’re trying to measure.
Part 4 — What to record for every sample
- Use the GOES tagger software, it is very simmple and quick, just follow the instructions on the program
- Source type as per the program, or other
- Location (GPS sample collection location should be accurate to about 10 m)
- Date and time taken, when sample was collected
- Repeat the above for your 5 photos; the information will be the same for each of the 5 photos
Part 5 — Keeping samples clean (quick do’s and don’ts)
- Do always flush three times before the real fill.
- Do keep the end cap on during the long drain.
- Do keep the filter open for as short a time as possible under the microscope.
- Do run your blanks honestly and label them.
- Don’t wear fleece or fluffy synthetics while sampling.
- Don’t breathe or lean directly over the open filter paper.
- Don’t collect rainwater under trees, roofs or gutters (unless you’re deliberately studying run-off, recorded separately).
Sending the data
The image files are going to be too large to send by email; the best approach is to store your folders in the cloud, Google or iCloud, and then send a link to the files by email. to howard@goesfoundation.com
A note on tap water
If you find particles in tap water, please record it and send us the photos – but don’t treat a single sample as proof of a problem with any water company’s supply. This survey measures what the filter captures, which can include fibres from the air and the kit as well as the water. That’s exactly why the blanks matter. We look at patterns across many samples, corrected against blanks, before drawing any conclusion. Please avoid publicly naming a supplier as unsafe on the basis of your own single sample.
Safety first
Never put yourself at risk for a sample. Don’t wade into fast or deep water, don’t lean over the side of a moving boat unsafely, and take care on slippery banks and rocks. A missed sample is never worth an accident.
Thank you for being part of the Global Ocean Environment Survey. Every sample — and every blank — adds a piece to the picture.